Wednesday, November 29, 2017

How to Create Digital Mathematical Expressions


Do you often struggle trying to create a mathematical expression or equation in digital format? Does this often deter you away from making your quizzes in digital format?  Eric Curts has found a free and open source tool that will allow you to create mathematical expressions or equations.  Again, this tool is FREE, and is very SIMPLE to use.  Plus, you don't even need to create an account.  

Follow these steps to create a mathematical expression:


1.  Simply go to codecogs website
2.  Click on Equation Editor


3.  Scroll to the middle of the page and under the screenshot image, click on the link that says "Full Panel Range (Click to open Standalone Equation Editor)", as shown below.


4.  The equation editor will open and you can type your mathematical expression or equation into the box.  Use the appropriate symbols above the box to assist in writing your equation.


5.  Once you are done with the equation, it will be displayed underneath the equation box.  Simply drag it into a Google Document or into a Google Form and it will be inserted into the file.  

Click on this link to view the short screen cast on this procedure and inserting the equation into a Google Form.  


Sunday, November 12, 2017

A Top Contributor Summit Reflection


The stage at the Top Contributor Summit in Mountain View, California.  

Being a Top Contributor in the G Suite for Education help forum is an accomplishment that I am very proud of.  When I first started to contribute in the forum, I just wanted to help people with their issues.  I figured, let me answer some questions because I knew my response was correct.  As I continued to help people, my rank in the forum advanced and it didn't take long for me to be addicted to it.  Last year, I made Top Contributor status and this year, I was invited to attend the Top Contributor Summit in Mountain View, California.  To sum up my experience, it was absolutely incredible!!!!


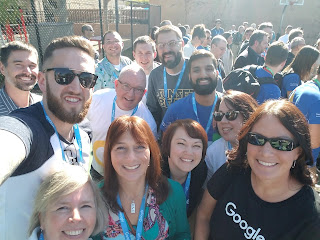
The team of people I work with are wonderful.  We are all educators and Googlers who are passionate and dedicated to help our users in the forum.  Many of us traveled to Mountain View from different areas of North America, but Graham was the furthest from England.  It was great to finally meet everyone face to face.  As a team, we are committed to the forum, passionate, and have one thing in common, to help the end user.  The G Suite for Education forum supports all educational issues in G Suite, which includes all Google apps, Google Classroom, Expeditions, and Forms. 


On the first day of the summit, all of the Top Contributors gathered in one room.  People came from around the world to attend the summit.  Although many did not speak fluent English, everyone had one thing in common, their passion of Google and to help the end user.  


Another thing we had in common was music.  The opening presenter organized everyone by the color of the plastic tube that was left on everyone's chair.  Everyone had a different color tube and a different beat to follow.  By the end of the exercise, the entire audience was in sync. So that's how Google, the tech giant, engages their audience!  It was amazing!

Dashini Jeyathurai who is a Knowledge Manager, Global Vendor Operations, YouTube expert.

All of the presenters spoke about their expertise in their product and some even provided a demonstration.  Some items that were displayed were the Pixelbook, and the Google Assistant.  Additionally, the presenters left time for the audience to ask questions or provide feedback on their products.  


I was so happy to hear the presenter speak about machine learning.  Google is going to continue and enhance machine learning in their apps.  Their goal is to have their apps be so smart that it will know your habits and what you are thinking.  I was amazed by this because this aspect is a huge part of Computer Science.  So, I decided to ask the presenter a question, and represent the educators and students who can benefit from this concept in schools, K-12.      

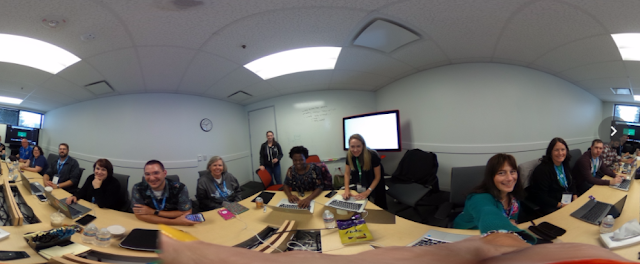
On the second day of the summit, my team was assigned to learn about Google Drive and Docs.  We were in a small group with the Google Play team, as well as the community managers from each team. We were informed on product updates on Google Drive, Docs, Sheets, and Sites.  In the afternoon, my team went into a conference room in a different building and collaborated with the community managers for G Suite for Education.  We spoke about our team vision and goals, product updates, provided feedback and even experimented with Jamboard.  For me, this day was invaluable.  Being able to build relationships and a team vision with people who have a common passion is priceless!


Overall, my experience in attending my first Top Contributor Summit was awesome and memorable.  I enjoyed all of the conversations I had with many people, and I especially learned a lot. The group of people on the G Suite for Education team are awesome!  I am so thankful to be a part of this community.  

A few shout-outs:  Thank you Aditya, Anita, Evan, and Lauren for allowing me to be a part of this community. I am truly honored and proud to be on this team.  I learn so much from everyone on the team.  Thank you Fred to mentoring me and answering all of my questions.  Thank you to all of the people who organized this summit! Most of all, thank you to my husband for always supporting me. It was truly amazing! 

Here is a photo collage of the many people I met and some other interested icons.


Wednesday, October 18, 2017

New Features of Google Slides


The Google team recently released many new updates in Google Slides.  I found all of them to be very helpful.  Here is a brief summary of the updates:

1.  Keep Notepad is integrated in Google Slides, similar to Google Docs, it will open Google Keep in the right margin and allow you to add your notes to the slide deck.


2.  Link Slides will allow you automatically update information that is copied from one presentation into another.  

3.  Insert Diagrams is a great feature that will allow you to insert hierarchy charts, timelines, process, relationships, and cycle diagrams directly into the slide deck.  The user can change the content of the information very easily.


4.  View Options allow you to view the slide deck either in a grid view or flimstrip view.  This option can be found at the bottom left corner of the slide deck.


5.  Skip Slide will allow you to hide a slide when presenting it to an audience.  It will still remain in  your slide deck, but will not be shown to the audience.


6.  Add-ons will allow you to enhance your slide deck with many new add-ons such as Pear Deck, Adobe Stock, Shuttershock,  


Here is a screen cast that showcases these updates.  You can also click on the link to view it on YouTube.


To read more information about these updates, please visit the Google for Education Blog.  


Saturday, September 30, 2017

Week 3 - A Computer Science Reflection


Week 3 of #CS4WDMS was a week of making connections.  I am using the accelerated course in code.org, in which the students completed The Maze lesson, which consisted of 20 puzzles, and The Artist lesson, which consisted of 10 puzzles.  

In The Maze, the object for each puzzle was to navigate the bird or zombie to the pig or sunflower. As each puzzle was completed, the next one was more challenging.  Additionally, there were more difficult command blocks available as the students progressed through the puzzles.  A challenge for the students was to complete the program using the recommended amount of command blocks.  If the students used more than the recommended amount of command blocks, code.org did not mark the puzzle as completed.   When I introduced the interface to the students, I pointed out all of the areas of the editor, including this information.  I found they were conscious of the number of blocks needed to complete the puzzle. 

Also, in The Artist, , the object for each puzzle was to use the block commands to trace over the specific shape(s) shown in the output section of the editor.  In this lesson, pixels and degrees of an angle were the unit of measure being used.  As the students progressed through the lesson, the shape(s) shown in the output section were more challenging than the previous puzzle.  Overall, I found this lesson to be more challenging than The Maze.    

Many of the students worked independently until they reached puzzle 5. As they were troubleshooting, I decided to have them make connections with the command blocks and the JavaScript code.   

I displayed the answer key for puzzle 5 on the board, which was written in JavaScript.  Then, I explained each line of code. We compared the JavaScript to the command blocks so they can make connections and see the differences between the two.  We discussed commands, loops, variables, initializing and incrementing variables, units of measure, and syntax.  I also explained that computers do not understand block commands, they understand source code like JavaScript.  At this point, students were able to use JavaScript and critical thinking skills to create the correct block base code in the editor for puzzle 5.  


After that, I displayed the JavaScript code on the board for a few more puzzles.  The students were able to connect the correct block base command to the JavaScript code.  I was amazed to see how quick they picked up on the source code.  Some students were even able to explain it to their peers.  I witnessed a break through moment for my students, in which I knew they felt successful and achieved leadership skills. 

Many of the students  had prior knowledge of code.org because they completed the Hour of Code course on the code.org website last year.  However, they did not complete the accelerated course, and they did not discuss in detail about the sections of the Blockly editor, and the JavaScript code.    

As week 3 comes to an end, next week will be my last week with this group of students.  I will be using Ozobots next week to expose them to more block base coding, Ozocodes, and more computer science concepts.  

I am planning to implement different manipulatives to each group of students such as Ozobots, Bloxels, and Littlebits.  Also, I will be alternating between code.org and CS First, but for now, I will be using code.org.  

Stay tuned for my next blog post on my student's experiences using Ozobot.  Follow my class on Instagram at Mrs.Mattina and follow #CS4WDMS on Twitter.  


Sunday, September 24, 2017

Week 2 - A Computer Science Reflection


Last week was week 2 of introducing Computer Science concepts to my students.  I was happy to see that all of the students followed proper procedures when entering the classroom.  They are definitely getting more comfortable with procedures and expectations in my class.


When entering my room, the students login to the computers, login to the GSFE account, then they go to Google Classroom.  Once in there, they complete the do now assignment which allows them to practice keyboarding skills on typing.com for about  7 - 10 minutes.  I use a Google timer to keep track of time.   This application provides a teacher dashboard which  allows me to keep track of their progress.  I created a class and the students used their Google account to sign up and create an account.  I love having the single sign in option for the students. It saves so much time.  Just be sure the students are logged into their GSFE account first. 

Afterwards, all of the students logged into code.org where they completed The Maze lesson which consists of 20 puzzles in the accelerated course.  We watched the introduction videos together about the Blockly editor.  We discussed the output, toolbox, and workspace sections.  I pointed out the resource and notification sections, which are not technically outlined in the editor, but felt these areas are important for the students to be aware of.    We discussed in detail conditional statements and loops and we even did a few simple unplugged algorithms together to ensure they understood the commands and concepts. 

When each puzzle in lesson is completed, more complicated block commands are offered in the next puzzle.  Students are expected to use them in their code.  If they don't they will write a program that has too many lines of code, which will have an incomplete status for the puzzle.  In order for the students to  get full credit for the assignment, I expect all of the puzzles to be fully completed.  I can monitor their progress in the teacher dashboard.  

As students completed the accelerated course, I had them record their progress in a spreadsheet.  The spreadsheet consists of the learning goal, the learning goal scale, which is a 3 point scale, the date, and their rating.  This spreadsheet is shared with them in the assignment in Google Classroom. Although I can monitor their progress in the teacher dashboard in code.org, this allows me to monitor their growth from the beginning of the lesson to the end.  Additionally, I am going to have the students reflect about The Maze lesson using Flipgrid.  Stay tuned for updates.  

In conclusion, the students seemed to learn a lot last week and continued to show leadership, ownership, and motivation to complete The Maze lesson.  Next week, the students will move on to lesson 3, The Artist, which consists of 10 puzzles.  Additionally, I will introduce logical thinking to the students, which is an unplugged activity using Google Drawings, and Made with Code, which is another block editor. 

Please follow my class on #CS4WDMS on Twitter and Instagram.  

Stay tuned for more updates next week.

Saturday, September 16, 2017

Back to School Reflection with Computer Science


This year I am teaching Computer Science to all 6th grade students.  My schedule entails having a group of students for about 20 days then rotating to a new group. This rotation allows me to teach the same concepts to all of the students, and it allows me to use different manipulatives, such as Bloxels, Ozobots, and LittleBits, and internet tools, such as Code.org, CS First, and Scratch, for each group.   My goal is at the end of the school year, having all of the 6th grade students being introduced to Computer Science and exposed to coding.

When I found out I was teaching Computer Science, I was excited and anxious to teach the students everything I know about the subject.  Then, I had a reality check.  Having a group of students for about a 20 day cycle would not allow me to teach them everything I wanted, so then I focused on just the basics.

Since this is the first time Computer Science is being offered at my school, during the summer, I had to write curriculum.  Knowing that I would have a group of students for about a 20 day cycle, figuring out the topics and the tools to implement into my class was a bit challenging.   I decided to have four units, and teach one unit per week.  Of course some units will overlap with others, but at least it is a start.  Throughout the year, the curriculum will be a work in progress and I will be revising it accordingly.  The units are listed below.

Unit 1:  Introduction to Computer Science
Unit 2:  Introduction to an Interface
Unit 3:  Computational Thinking
Unit 4:  Logical Thinking

In Unit 1, I go over the basics of Computer Science, the affects it has in our daily lives, binary code, digital etiquette, teamwork and relationships.  The picture below shows students completing an unplugged activity by using buttons to write their names in binary code.  Another unplugged activity I used was using a Computer Science BreakoutEDU game to build teamwork and relationships.


In Unit 2,  I will go over a block based interface, and the students will start to code.  While they are coding, they will be using computational and logical thinking, which are units 3 and 4.  Additionally, they will learn important skills such as creativity, collaboration, critical thinking, and problem solving skills.

Furthermore, I will be using social media and a class blog to document our class journey and to give students a voice.  Students can use #CS4WDMS on Twitter and Instagram to show their work to a global and authentic audience. They can also reflect on their experiences using a class blog.   Because I decided to implement social media into the classroom, I included online safety and digital etiquette into Unit 1 of the curriculum.

Next week, I plan to implement Unit 2, which will introduce students to a visual programming language, or a block based coding.  This can either be Blockly, Scratch or the Ozobot Blockly editor. Whatever I decide, it will expose the students to similar concepts commands, the tool box, the workspace, the output area, and much more.

Please follow our class journey on Twitter and Instagram using #CS4WDMS and read the class blog at http://cs4wdms.blogspot.com/.  Stay tuned for the next blog post.


Tuesday, September 5, 2017

Back to School: What's in your Tech Toolbox?


As educators, our minds are always turned on. We are always learning, and we are constantly thinking of new ways to help our students be successful. Let’s not forget, however, that as educators we also need guidance to be effective, efficient, organized and successful.

Being a technology integration coach and a Google Certified Trainer, I wanted to share some tech tips and recommendations with you to help you get started this school year. Many of my recommendations revolve around G Suite for Education (GSFE).

Tips for Google Classroom
  1. Instead of listing all of your classroom resources, websites, and so forth on the About page, list them in a Google document and attach that link to the About page. This will allow you to sort them in any order you choose, format them and manage them more easily. Be sure the setting permissions to the Google document are set appropriately. Additionally, you can insert this link onto your school webpage.
  2. Title the assignment with a number and a description, and provide the same naming convention to any attachments for that assignment. This will allow you to easily associate files to the assignments in Google Drive. For example: “001 All About Me.”
  3. Always include general directions and technology directions in all of your assignments. This will provide guidance to the students when the assignment is completed.
  4. Install the Chrome extension “Open Side by Side” by Alice Keeler. This Chrome extension will split the screen and have the Google Classroom work page open on one side, and the student document open on the other side. This will allow you to easily navigate between the student document and Google Classroom grading page without having to tab back and forth between windows. It is available in the Chrome web store. If you cannot install it, contact your Google administrator or your IT department for assistance.
  5. Use Topics on your posts to organize and filter your stream so that the information can be found easily. For example, create a topic called “Week of ...”, and insert it on any assignment for that week. This will allow students to display all the posts for that specific week.

Tips for YouTube
  1. Use your channel to upload screencasts and animations. This will help you flip your classroom and allow students to learn at their own pace.
  2. Create playlists on your channel to organize your content.
  3. Have your students subscribe to your channel so they get notifications when a new video has been uploaded.
  4. Use Snagit, Screencastify or Screencast-O-Matic to create short tutorials of your content.


Tips for Google Forms
Here is a list of new features of Google Forms that may help improve your workflow:
  1. All consumer users now have the ability to upload a file into Google Forms. Previously this option was only available to GSFE users. This can be helpful for parents and guardians to provide you with notes concerning their child.
  2. Another update is having intelligent response validation. This feature will allow you to quickly add a validation to a Forms question, making your workflow quicker.
  3. Another new feature to Forms is the ability to set up default values when creating new Forms. This is a huge time saver. This can be found in the Preference menu and can be applied to all new Forms that are created.
  4. You have the option to rearrange header sections. Now you can quickly and easily rearrange sections in your Forms.
  5. Finally, you now have the ability to use a checkbox grid question. This new question type will allow you to select multiple options in a category. One example use for this tool is scheduling.

Introducing Flipgrid

I recently learned about a tool called Flipgrid. When I realized how powerful and easy it is to use, I immediately fell in love with it. Flipgrid will allow you to create a video dialog or discussion with your students. Students use their device’s webcam to respond and participate in the discussion. This tool gives everyone a voice, and I recommend that you try it. I will be using this tool with my students as a reflection or exit ticket. The best part is it’s free! Simply visit www.flipgrid.com for more information and to create an account.

I work with and train many educators, and most of them want easy and practical ways to implement and use technology in their classroom. With this article, I hope I was able to provide you with some information and guidance that can be helpful to your during the school year.

Check out the digital version of the article from the NJEA website.

Tuesday, August 1, 2017

Back to School: Google Classroom Updates


The Google team has release new updates to Google Classroom prior to the start of the school year, (at least in NJ).  They have been listening to all of your suggestions and improved or added new features to Google Classroom.

First, many users wanted to be able to organize their classes on the home page.  Now teachers and students have the ability to drag and drop the class cards in any specific order on the homepage.  You can organize your class cards by schedule, or by highest priority, etc.


Another great simple feature is having the class code projected in Google Classroom.  Now, you don't have to write the class code on the board for students to join, simply display it and it will be enlarged and displayed to the entire class.  Simply go to the 'Student' page, click on the down arrow next to the class code, and select 'Display'.


Next, another great feature added to this version of Google Classroom is having a single view of a student's work displayed on one screen, for a particular class.  This page will list all of the student's work and the status of it for both the teachers and students.  For students, this can be accessed from the class card screen on their home page.


Furthermore, the team has provided the option to transfer course ownership to another teacher in the course.  The teacher must first be a co-teacher of the course in order to have ownership.


Finally, the team has provided the ability to distribute decimal grades to students.  In the past, you were limited to whole numbers only.  Now, you will have the ability to add decimals to the grade with 2 decimal points.


As you can see the Google Classroom team has been listening to all of your feedback and has release many new features prior to the school year.  You can read more about these updates on Google's blog. 

As a Google Classroom expert team member, it is important for you, the users, to continue to provide feedback to the team as often as you can so that the engineers can continue to improve Google Classroom.  If you would like to leave feedback, please click on the ? at the bottom of the screen in Google Classroom.  I hope you enjoy these updates and find them helpful.


Tuesday, July 11, 2017

5 New Updates to Google Forms


Today, the Google Forms team released updates to its app.  All of the updates will help improve productivity, but the one I like the most is the ability of having all consumer users the option to upload a file to a Google Form.  Previously, this option was available to G Suite for Education users.

Another update is having intelligent response validation.  This feature will allow you to quickly add a validation to a forms question.  For example, if you know the answer to the question should be an email address, there is an option to allow email addresses.  It uses machine language to predict your validation.

Another new feature to Forms is having the ability to set up default values when creating new Forms. This is a huge time saver.  This can be found in the Preference menu and can be applied to all new Forms that are created.

Furthermore, you have the option to rearrange header sections.  Now you can quickly and easily rearrange sections in your Forms.

The last update is having the ability to use a checkbox grid question.  This new question type will allow you to select multiple options in a category.  An example of this can be used for scheduling.

I am excited about all of these new features and can't wait to start using them.

To read more about this update, please visit the G Suite for Education blog page.

Friday, June 2, 2017

The Suite Talk - Episode 3


Episode 3 of The Suite Talk is completed!  In this episode, I spoke about end of the year practices for Google Classroom and Brian spoke about transferring ownership of files using Team Drive.

Additionally, the app of the show was Google Classroom.  I discussed the new features of Google Classroom which are: 
  • Users with personal Google accounts can create and join classes. 
  • A return count was added to assignments
  • Customized email notifications

Website, YouTube, and Feedback

You can visit The Suite Talk, and subscribe to our YouTube channel for notifications. If you have any questions or feedback, please fill out the Google form.

Show Notes

Click here for the show notes and the video is displayed below.


Episode Link and Video

Click here to view the episode.


Wednesday, May 24, 2017

Google Classroom Notifications Feature


The Google Classroom Team always listens to feedback from their users.  Being on the team, I know first hand the Googlers value your feedback, and they prioritize it accordingly.   That is why I always stress to users in the forum, to always leave feedback by clicking on the ? at the bottom of the screen.  The animation below shows how to send feedback to the team.  You can also click on this link


An important update in Google Classroom was the enhancement of the email notifications.  In the past, you only had the option to enable or disable them, and this was a global setting. This would flood your inbox with emails.

Now, you can specify what type of email notifications you would like to receive from Google classroom. It is still a global setting, but now you have the option to enable/disable notifications so that your inbox does not get overloaded with Google Classroom notifications.  The image below displays all of the options you can enable/disable for your email notifications.  


Additionally, you can change your profile picture in this area too.

Continue to leave your feedback and you may see your suggestion implemented in Google Classroom.  


Publication and Duplicate Features of Google Sites


Google release a new feature for Google Sites that will clarify how the site is published on the web. 

Now you can request that your site is not displayed on public search engines as shown below.  By default this option is disabled.  If you decide you do not want your site displayed on public search engines, simply check the box.


You can read more about this latest feature on the G Suite for Updates Blog.


Another great feature available is the option to a duplicate a page.  If you want to use a layout of an existing page for a new page, you don't have to recreate the new page from scratch.  Simply use the duplicate feature to make a copy of the page, rename it, and it will show up in the navigation menu. 


Wednesday, May 3, 2017

New Feature of Google Sites: Vertical Grouping


Google released a new feature in Google Sites.  Finally it will be easier to create text boxes and move them under images, similar to a caption.  Personally, I am so happy they implemented this new feature.  I had such a hard time formatting my page because of the limitation, but now I am happy to see this new feature is available.  Way to go Google Sites Team!

See the animation for more details.


Tuesday, May 2, 2017

What is EquatIO?


equatio.png


What is it?
  • EquatIO is a Chrome extension that will allow you to create mathematical expressions or equations using dictation or typing from your keyboard or touchscreen.
  • You need to download it from the Chrome Web store.


Implementation
  • icon.pngThis extension will live in the Chrome browser.  An incon will be displayed at the top right corner when the extension is enabled.  
  • You can use this extension to create mathematical expressions or equations in Google Docs and Google Forms.

Docs-icon.pngforms icon.png
   
  • In a Google document or Form, click on the extension to activate the interface.  It will be shown at the bottom of the screen.


Interface

equatio Interface.jpg


Offers an:
  • Equation, LaTeX Editor, Handwriting Recognition, and Voice Input of mathematical expressions, or equations.
  • Insert Mathematical operations, symbols, functions and Greek letters
  • Inserts the equation as an image into the form or document


Mathematical Operations:

Mathematical Symbols:


Mathematical Functions:


Greek Letters:


File:Youtube icon.svg - Wikimedia Commons


Screen casts on YouTube


View the short screen cast about Handwriting Recognition.
View the short screen cast about the Speech Input tool.


Need more help?  Visit the website for more information on this great extension.

Subscribe to my YouTube channel for notifications of video uploads.