Friday, May 30, 2014

How To: Manage iPads using Apple Configurator


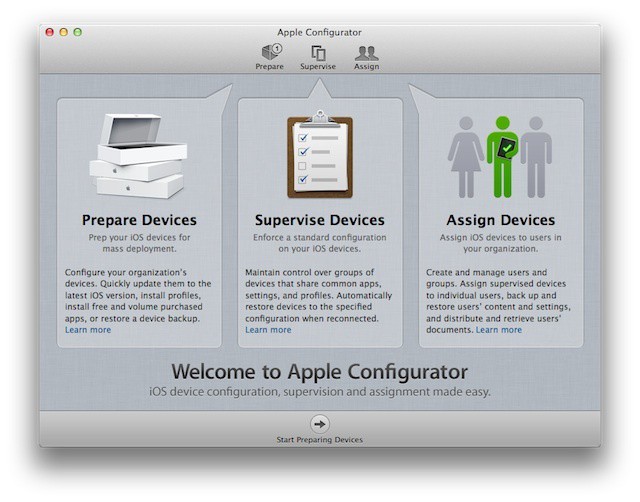
If you are using iPads in your school, I would highly recommend you mange them using Apple Configurator. Apple Configurator is a free management tool that is used to help manage multiple iPads.

A few weeks ago, I installed Apple Configurator on a MacBook and now the iPad cart is managed using this program.  One of the biggest advantages of using Apple Configurator is that the apps can be purchased and redeemed through the VPP (Volume Purchase Program).  This will help manage the amount of money spent on an app and keep track of the licenses.

First, you must check the OS X on the device that will run Apple Configurator.  The OS X must be 10.7 or higher.  So, I had to upgrade from Snow Leopard, (10.6.8) to Mavericks, (10.9).


After upgrading the OS X, I was able to download and install Apple Configurator through iTunes.  Once it was downloaded, the iPads needed to be 'Prepared' which allows you to create profiles, number and/or name the devices, setup restrictions and more.  

A few of the profiles I created were for:
  • proxy and wifi settings
  • restriction policies on the devices
  • disable apps on the devices
One of the restrictions I made active was to disable the mail app so the user cannot setup their personal mailbox on the device.


Next, is the 'Apps' section which allows you to load the apps from iTunes into Apple Configurator.  This will allow Apple Configurator to recognize apps that were in iTunes.  Note, if you purchased an app using an iTunes gift card, that app will not be transferred over into Apple Configurator.  You would have to purchase the app again through the VPP.  In my case, only the free app were recognizable in Apple Configurator.
Once the profiles and apps are loaded, then you are ready to prepare the devices.  You have to hook up all of the iPads to the cart and prepare all of them.  This part may take a long time to complete.

After the devices are prepared, then you can 'Supervise' them which allows you to create a master image on an iPad, back it up to Apple Configurator, and then restore it to the other iPads.  One of the features I created on the master image was groups on the home screen so that I can sort apps accordingly.  

Once all the devices were completed and managed using Apple Configurator, I created an iPad Apps Request Google Form to allow staff to request to purchase an iPad App. In addition, staff uses a Google Calendar to schedule the iPad cart for technology integration.  I used appointment slots to create the calendar.  This way, the staff can see when the iPads are available and can reserve them accordingly.  This is a self service approach and takes the burden off of someone to manage a calendar.  

This is a new workflow for managing and reserving the iPads.  Any improvements will be made accordingly.  


Wednesday, May 28, 2014

Tech Tip Tuesday: Read&Write for Google


Read&Write for Google is a free Chrome extension that is available in the Chrome Store.  It provides comprehensive reading and writing supports for Google Docs and the Web, as well as PDF's, ePubs, stored in Google Drive.

These supports include:
  • Read Aloud with dual-color highlighting
  • Word Prediction
  • Translator
  • Talking and Picture Dictionaries
  • Fact Finder
  • Highlighters and ability to collect highlights
  • Vocabulary Builder to easily create a list of words with text definitions and images
  • Annotations (PDF and ePub)
  • Navigational tools (PDF and ePub)
Here is a screenshot of the toolbar once the extension is installed.


After the extension is installed, I am sure you will find the features of this tool very helpful.  Remember, you can always hide the toolbar by clicking on the up arrow for the Read&Write icon, or just uninstall it.


Monday, May 26, 2014

Top Tech and Internet Savvy Blogs by VoiceBoks


I am happy to announce that I not only was nominated in the top 50 list of Top Tech and Internet Savvy blogs from voiceBoks, but I made the top 10 list.  After a month of voting for the top spot, I am very excited to say I came in first place! I am so thankful for all of my followers on social media, friends, and family who voted for me.  

My blog will be featured on  The Social Media Panel's sidebar for a year, a spot on the Top Mom Blog category, a featured post on voiceBoks, and a spot on voiceBok's Wall of Fame!

My badge will be sent to me soon so look for it on my blog and on The Tech Lady Express website.  

Again, thank you so much for your support.  I am truly happy to be able to share my stories and help others along the way.  I will continue to do my best to post quality information on technology, education, and technology integration in the classroom.


Thursday, May 22, 2014

How To: Use gMath Add-on in a Google Document

gMath Add-on 


gMath is an add-on for a Google document that will allow you to type and add formulas and graphs into a Google document.   If you are a math teacher, I highly recommend you install this add-on.  

Let's get started, first, you will need to install and authorize the add-on to your list using your Google account.
1. Click on the Add-on Menu in a Google Doc and choose Get Add-on.


2. In the Add-on Menu scroll down until you see gMath (it will soon be searchable).  If you do not see the gMath add-on in the list, then you can click on this link to access it.


3. Click on the Free button in the gMath block.


4. Now an authorization window will pop up. 


5. Click Accept and it will take you back to your Google Doc. If you see the box describing gMath, it was successful!


6. Have fun using gMath! If you have an issue, you can let me know by clicking the Help button and Report an issue. 


This information was originally posted by +John McGowan.  

Tuesday, May 20, 2014

Tech Tip Tuesday: Two New Features of KaHoot!


First, Kahoot now offers, rich text editing!

You can now create questions & answers with:

  • Basic mathematical notation such as Subscript2, Superscript2 and Special Characters
  • Emphasized words or phrases with Bold or Italics
  • Other Special Characters including Greek and Latin

How does it work?  It works very much the same as any text editing software, such as Microsoft Word. When creating or editing a Kahoot from a laptop or desktop web browser, you will see an additional panel of buttons appear when you place your cursor into the question or answer fields, looking like this:
image

For more information on this feature, visit Post with Rich Text Editing.


Second, Kahoot will allow you to "kick" out inappropriate names in the session.  Once the student enters an appropriate name, you can click on it in the lobby area, and it will prompt you to remove it.  The student's device screen will turn red and kick them out of the session.  

For more information about this feature, visit  How to Kick out Inappropriate Nicknames


Thursday, May 15, 2014

Computer Science - Computer Programming


During the month of December, Computer Science Education Week is promoted and is a national movement for students in K-12 schools.  Computer Science is an important subject or concept to teach students because it will teach them:

  • about meaningful context
  • the learning process 
  • break down complex ideas into simpler ideas
  • collaborate with others
  • keep calm and move on when frustration sets in
  • sparks their creativity and critical thinking skills

These are just a few benefits of learning to code.  Students today are surrounded by so much technology, that they should have a better understanding of how it really works.  For example, the algorithm to display ads in Facebook or Google, or the HTML and Javascript code to load a web page.

Here are a few websites that will help students get started on coding.


1- Code Academy


This by far the most popular of them all. Code Academy provides lessons on writing simple commands in JavaScript, HTML and CSS, Python and Ruby.

2- Girl Develop It


One of many programs geared toward females who want to code, Girl Develop It  is an international nonprofit that provides mentorship and instruction.

3- Udacity Computer Science Course ( not free)

Stanford University’s Udacity is one of many sites that make college courses—including Introduction to Computer Science—available online for free.

4- Teamtreehouse


Learn from over 1000 videos created by expert teachers on web design, coding, business, and much more. This library is continually refreshed with the latest on web technology so you'll never fall behind.

5-The Computer Club House


The Computer Clubhouse, which Resnick co-founded, works to “help young people from low-income communities learn to express themselves creatively with new technologies,” as he describes.
6- Coder Dojo


Through CoderDojo’s volunteer-led sessions, young people can learn to code, go on tours of tech companies and hear guest speakers.
7- Code School


Code School offers online courses in a wide range of programming languages, design and web tools.
8- Girls Who Code


Girls Who Code, geared specifically toward 13- to 17-year-old girls, pairs instruction and mentorship to “educate, inspire and equip” students to pursue their engineering and tech dreams.
9- Black Girls Code


Through workshops for young girls of color, Black Girls Code aims to help address the “dearth of African-American women in science, technology, engineering and math professions,”

Tuesday, May 13, 2014

Tech Tip Tuesday:Add captions to Images using Phrase.it!


Phrase.it is a web tool that allows you to edit and customize your images through adding speech bubbles and different image effects. Students can use this service to create picture stories and share them with others. The great thing about this web tool besides its being free is that it does not require any registration and hence students won't need any email addresses to use it.


The process of creating a picture story in Phrase.it is very easy. Just head over to its homepage and choose whether you want to upload a photo from your device, import it from Facebook or use a random stock photo. Once the photo is uploaded you click on "bubbles" to add different bubble shapes to your image. You can also change the shading of your image by click on " drama". When your image is ready you click on "preview and save" to save it.

Monday, May 12, 2014

A School Wide Lip Dub - Follow Up


Here is the completed video of the lip dub from Friday, May 9th, 2014 at the +William Davies Middle School. Enjoy!  http://youtu.be/NK2JlWscO3k


Saturday, May 10, 2014

A School Wide Lip Dub -" Because I'm Happy! "


On Friday, May 9th, 2014, the +William Davies Middle School performed its first annual Lip Dub to Pharrell Williams song, Happy!

It was amazing! On the day of the lip dub, students and staff had so much school spirit! Everyone was dressed in school colors, (red and black), decorated the hallways with balloons and streamers, painted posters, and most importantly, worked together to get the job done.

From Monday, 5/5 through Thursday, 5/8, all middle school students were required to take the NJASK test. Although students knew about the lib dup, there were no signs posted anywhere in the school about it.  The school was in "testing" mode.

However, on Friday 5/9, the entire school tone changed.  Students were motivated to decorate the hallways with streamers, posters and balloons.  Staff contributed in the lip dub by decorating, having their students create posters, (some even used a theme), and playing the Happy song in their classrooms so the students could memorize the words.  Beth Steinen, a 6th grade Social Studies teacher, had her students create posters with the word 'happy' in different languages. Another teacher created a wild wild west theme for her students.  Teachers took selfies of their students and posted it to social media using the #WeAreDavies.   Everyone supported one another to make this day a success. It was truly amazing and a sense of pride!


 +Meghan Fitzgerald came up with the idea so she led the crusade.  She had her 8th grade LMT students brainstorm the route of the lip dub on both the 1st and 2nd floors. She assigned locations in the route for all the teachers and their students. She had to make sure the timing of the song was correct so the students who were lip syncing came out during their part of the song. This took a lot of practice and planning.  Most importantly, she had to make sure all students were allowed and had permission to participate in the lip dub because it was being filmed and will be posted to the +William Davies YouTube channel.

+Leanna Mullen of FilmReel Productions was responsible of filming the entire lip dub. Her and Meghan coordinated together to figure out how to break up the filming in the route.  Both 1st and 2nd floors had two takes, meaning it had to be filmed twice, incase of a mishap.  My role was the music. I had to make sure the students were able to hear the song while walking the hallways.  A portable CD player boom box, "old technology", was used to play the music. Basically, I held it over my head, played it loud, and just followed behind Leanna. Meghan, followed behind us to help coach the students and keep them on pace during the taping.  The school resource officer, Art Fadden, was behind us recording the event on his iphone, while Stephanie Wroniuk, a Vice Principal, was rallying the students.  Here is a glance of a behind the scene video taken by Kevin Morrison, a Vice Principal.


The lip dub ended in the gym where all of the 8th grade students waited anxiously to see the unveiling of Dagor, our school mascot.  They were surprised to see their school Principal, Mr. +Stephen Santilli was Dagor!


 +Leanna Mullen will  now work her magic and put together a video for the lip dub.  The video will be reviewed by Lead Learner, +Stephen Santilli for approval.  Once it is approved, I will post it to the William Davies You Tube channel.

It was truly amazing to see everyone, students, staff and administrators, work together for a common cause. We are truly a school family!  We as educators, the Davies staff, modeled the 4 C's to our students: communication, collaboration, creativity, and critical thinking.  We modeled to our students by implementing this concept, a project can be successful and the possibilities are endless!  WE ARE DAVIES!


Thursday, May 8, 2014

Introducing Edmodo Snapshot


logo_edmodo.jpeg


menu.png

Edmodo has a new feature included in their application, called Snapshot.  It is a free service that will allow you to create quizzes for math and language that are aligned with Common Core Standards.

All you do is click on ‘Snapshot’ from the menu bar, then select a group you want to give the assessment to, specify the grade level, subject area, due date and time limit of the assessment, as shown below.

group.png


Once this is completed, select the topic and the standards you would like to target.  Edmodo will generate random questions that meet the standards.  It will list the standards and will provide you with the number of questions in the assessment.

math.png

At this point, you can preview the questions, schedule it to send out later, or assign it to the group now.  Once the Snapshot is assigned, you will be able to generate reports and monitor student progress on completion.

It is very quick and easy to create quizzes that are aligned with the Common Core Standards.  If you are an Edmodo user, this feature will just enhance your virtual classroom.

Wednesday, May 7, 2014

Introducing Google Classroom


Google has introduce a new edition to Google Apps for Education, called Google Classroom. If you are using gClassFolders, and Doctopus, Google Classroom may replace these scripts and it may even be a competitor for Hapara.

Here is some information about Google Classroom from Google:

Google Classroom will help teachers create and organize assignments quickly, provide feedback efficiently, and communicate with their classes with ease. Classroom is based on the principle that educational tools should be simple and easy to use, and is designed to give teachers more time to teach and students more time to learn. 


With Classroom, you'll be able to:
  • Create and collect assignments: Classroom weaves together Google Docs, Drive and Gmail to help teachers create and collect assignments paperlessly. They can quickly see who has or hasn't completed the work, and provide direct, real-time feedback to individual students.
  • Improve class communications: Teachers can make announcements, ask questions and comment with students in real time—improving communication inside and outside of class.
  • Stay organized: Classroom automatically creates Drive folders for each assignment and for each student. Students can easily see what’s due on their Assignments page.

In addition, Google Classroom will continue to protect student's privacy and will not display ads and never uses your content or student data for advertising purposes, and is free for schools.

Teachers can apply for a preview of Classroom. Based on the requests we receive, we’ll be inviting a limited number of educators to try Classroom in about a month. By September, Classroom will be available to any school using Google Apps for Education. Since we want to make sure Classroom plays well with others, if you’re a developer or partner, sign up to learn more about integrating with Classroom.

Preview of Classroom:


I know I will be signing up for a preview and have intentions of applying Classroom to our domain in September.

Tuesday, May 6, 2014

Tech Tip Tuesday: Build with Chrome


Build with Chrome


-chrome nerdeky.jpeg


Did you know Google offers an application called, Build with Chrome, where you can build LEGO bricks using Google Maps as your base template?


There are three modes, Explore all Builds, Build Academy, and Start Build.

explore_with_build.png

Explore All Builds
  • Allows you to explore buildings, even 2D structures, vehicles, characters, and random objects on a Google Map.
  • Each object is categorized.
  • You are able to zoom in/out of the map.
  • You can search by the most popular structures, your own structures, and publish them to Google Plus.


academy.png


Build Academy
  • Allows you to master your building skills by completing challenges.
  • Provides practice and training to build structures in various locations.
  • Will provide you with different tips and tricks to use for your structure


build.png

Start Build
  • Allows you to be a build a structure using your own creativity and imagination.
  • Allows you to publish your structure to a Google Map using your account.


This application will allow you to:
  • select different color LEGO pieces
  • select a variety of LEGO pieces to include in your structure
  • rotate the piece
  • zoom in/out of the structure
  • rotate and display your structure in 3D on a Google Map
  • easy to add and remove LEGO pieces from your structure

random.png


Here is the information about my structure:


Students can:
  • apply critical thinking and problem solving skills
  • can easily adapt
  • use their imagination and creativity to produce a structure, town, or city
  • contribute to building a community with other users
  • collaborate and share their communities
  • publish their structure to a Google map using their Google account
  • apply mathematical, architecture, engineering skills


Classroom Ideas:
  • create an eco-friendly, “green” community
  • narrate a tutorial on building a structure using the application
  • recreate a historical  landmark
  • sort pieces to reinforce mathematical skills


Friday, May 2, 2014

Creating Concept Maps using Google Drawings


Sixth grade students in Mrs. Conrad's science class at the William Davies Middle School are using Google Apps for Education and were assigned to create a food chain/web for their class.  Basically, they needed to create a graphic organizer or a concept map of their ecosystem.  

At first, I looked into an app called MindMap.  I found this application to be a bit cumbersome and I did not recommend using it for this assignment.  The next app I looked into was LucidChart, which is a great tool and I used it before, but again, not for this assignment.  The last app I looked into was Google Drawings.

I created a food chain/web template for them using Google Drawings.  The students already researched their information and saved it in a Google Document.  A few tasks they had to do was insert the images, text and shapes into the template. The were able to successfully navigate the application, however, we did have an issue with the size of the canvas. We found that you were not able to adjust the size of the canvas, or go to another 'page' in the drawings.  The students noticed a shaded area at the bottom right corner of the canvas, which can be adjusted by dragging, but it was limited and did not make a significant difference on the size of the canvas.  

The students were able to showcase the following technology skills:
  • Make a copy of the template
  • Insert/Edit Word Art
  • Insert/Edit Text Boxes
  • Insert/Delete Images
  • Insert Shapes and Lines
  • Troubleshoot the canvas size
Here is a picture of a sample of a food chain/web in progress.


Here is a picture of a completed food chain.