Wednesday, November 13, 2019

The Suite Talk meets Wakelet


I recently wrote a blog post for Wakelet on how I use this tool for my show, The Suite Talk.  You can visit the Wakelet website and blog to read more about how others are using this curation tool.  Here is my article that is posted on their blog.  I hope you find it helpful.


Introduction

My name is Kimberly Mattina and I am a Google for Education Gold Product Expert, a Google Certified Trainer and Educator,  a Wakelet and Ozobot Ambassador, a middle school Technology Teacher and Robotics adviser at the Galloway Township Middle School in New Jersey.  I am also the founder and host of The Suite Talk, which is a show and podcast about helping other educators integrate educational technology effectively into the classroom. My mission is to  #PayitForward. 

It was love at first sight!

When I heard the buzz about Wakelet on Twitter, I was naturally curious.   I wanted to learn more about this tool and how it can be utilized in the classroom. After becoming a Wakelet Community Member, I learned from other educators how they integrate Wakelet  into the classroom. I immediately became hooked on it!  Afterwards, I became a Wakelet Ambassador, and I never looked back! I use Wakelet daily and I heavily depend on it for many things. Now, I provide professional development about it to inform others how it can be used in the classroom. 

What is Wakelet?

In case you are wondering,  Wakelet is a curation tool that will allow you to organize resources such as websites, images, videos, PDF files, Drive files, Flipgrid videos, and a Twitter feed into collections.  It is an awesome tool to visualize, and organize your information for both students and peers.  

Wakelet meets  The Suite Talk

I use Wakelet in many ways, both personally and professionally.  In my school, I provide professional development for teachers and I encourage them to use Wakelet to collaborate with their peers, use it as their class website to post information,  and organize resources for their units, chapters, and lessons to ultimately create  a digital backpack for their students.   

However, personally, I use Wakelet in a different way.  First, I have multiple Wakelet accounts, one for my show, The Suite Talk, and one for myself that I use with my peers and PLN.  In my show account, I create a new collection each week that contains information specific about the show, the topic, and the guest.  All of these resources can accumulate and organizing them can be time consuming.  

In order for me to complete the episode collection in a timely manner, I created a  template collection specific for The Suite Talk which include links to my website, YouTube channel, and podcast platforms, as well as a link to the Facebook group, and newsletter.  In total, there are  about 13 items  that I include each week.  Also,  because I like consistency, I uploaded The Suite Talk logo into the header area and enabled the copy feature for the collection.  

Each week for a new episode,  I open the template collection, make a copy of it and rename it immediately. Then,  I include a title and a short description about the collection, and change the background image to a picture that aligns with the topic.   And just like that, all 13 items that were in my template are now in my new episode collection. 

At this point, I add specific links for the episode to my collection, such as a link to the specific YouTube video, a Flipgrid topic, a Google document with the guest information, and the Podbean podcast link.  In addition, I use the Wakelet Chrome extension to add any supportive  resources to the collection.   Afterwards, I invite the guest to be a contributor to the collection, so they can add any personal resources to the collection.  

Finally, once all of the resources are curated for the episode, I make the collection public and share the link to my website and refer to it as the show notes.  I also the collection on Twitter, and Facebook and in my newsletter too.  

Conclusion

In summary, being a Wakelet Ambassador and a community member gives me the opportunity to learn how others are using this wonderful tool in the classroom.  From using it as training agenda, a classroom website, a writing prompt for a reflection or exit ticket, and for curation, it has transformed my workflow tremendously.  I love Wakelet and will continue to ride the #WakeletWave! I recommend you try it too! For me, it was love at first sight!

Monday, September 23, 2019

Helpful Chromebook and Chrome Settings for Special Needs Students


The school year is in full force for me and I recently had a student
come to me for assistance with enabling settings in his Google account pertaining
to Chromebook Accessibility and Chrome extensions.
This is what I compiled. I hope you find it helpful!


Allow the student to login to their Chromebook.
Go the Chrome Webstore and Install the following: (more info below)

Go into the Chromebook settings, by clicking on the bottom right, where the clock is, and selecting ‘Accessibility’.  Either of these are optional for the student.

To listen to the ENTIRE PAGE:

To listen to PART of the PAGE

  • Click on ‘Select to Speak’ to turn on/off.  To listen to specific text, highlight the words, sentence, or paragraph, press the Search key Search + s.
  • Enable ‘Dictation’ - will allow voice typing in any field
  • Enable High Contrast Mode
  • Enable On-Screen Keyboard
  • Enable Large Mouse Cursor
  • Enable Highlight Mouse Cursor

Zoom in on the browser: CTRL + SHIFT and Plus +
Zoom out on the browser: CTRL + SHIFT and Minus -

Beeline Reader: 
  • It may ask you to select a “work”, “school”, or “home” account.  Just keep closing any messages or pop-ups from this extension.
Mercury Reader:  
  • Click on the rocketship to enable/disable the extension. It will remove any distractions from the page.
  • It will work on any website.
OpenDyslexic Font:   
  • Click on the O icon at the top right.
  • Enable the on/off switch
  • Right now, it is not working properly in Google Docs.  All of your words are being cut-off on the right side. However, you can still enable it for everything else on the web. 


Set it up as your default font in Google Docs. Follow the steps below

  • Create a new document or go into a current document with the formatting you want.
  • Drag your cursor through a couple of sentences that are set up the way you want them, with the font and line spacing you prefer.
  • Go to Format > Paragraph styles > Normal text.
  • Select "Update 'Normal text' to match."
  • Next, go to Format > Paragraph styles > Options.
  • Select "Save as my default styles."


Tuesday, August 27, 2019

CS First and Google for Education Updates for Back to School


The CS First and Google for Education teams both made some significant updates to the apps for back to school. 

In this episode of The Suite Talk, I go over the changes to the following:
  • an overview of the new CS First dashboard and interface
    • creating a class
    • the progress bar
    • sending feedback
    • adding activities 
    • two new activities available which are  Characterization, and Interactive Presentation
    • student rosters
    • student login and joining a  class
    • resources available
  • Google Expeditions can be used on Android enabled Chromebooks to run and guide tours. 
    • Also, the narration feature for the points of interest on the tours.
  • Google Classroom rubrics is now available in beta. Click here to read  more about it and to sign up for the beta program. 
  • The Lexend font is a new font that is now available for Google Docs. The font can help readers with special needs.  Click here to read more about it. 

Watch this episode on YouTube or listen to it on your favorite podcast platform. 


I hope you find this episode helpful.  For more episodes, please visit my website at www.thesuitetalk.com


Friday, June 28, 2019

Create your own logo using Designevo!


I was recently contacted by DesignEvo to try out their online application using a premium account.  DesignoEvo is a free online logo maker that will allow you to create customized logos for your brand or company.  It offers a large variety of templates with many different styles to choose from.  

First, you will need to create your free account and once this is completed, you can create your logo.  You can create a template by selecting from a category and then selecting a style you want.  If you are looking for a specific item, you can search the library using the search bar at the top.  This will narrow down your templates.


After you select your template, you will be prompted to enter your slogan name.  This information is optional, but I highly recommend you enter text in it.  This will help you visualize what your logo will look like. 


You will arrive at the canvas of your template.  At this screen you can add text and customize the font style, add shapes such as a badge, outline shapes, and much more, and include a transparent background or a color background.  

At the bottom of the screen is a toolbar that will allow you to change the size of the canvas, zoom in or out, include a grid to help you design your logo and alignment options.  

A feature that I liked a lot was having the ability to customize the text.  I was able to choose a color using a hex number, add special effects, such as an outline, and apply options such as opacity, thickness, color, and shadowing. Also, I had the option to format the text alignment, and apply spacing, line height, and curve of the text.  After I customized my text object, I was able to save time by copying it and using that format options for an additional object in that project.  It was super easy!  Here are a few examples that I created for The Suite Talk. 


I finally decided on this logo for The Suite Talk.  


Once I completed my design, I was able to save it and download it to my device.  The free account, allows you to download your logo, but it will be in low resolution.  The plus account, allows you to download your logo in high resolution and provide you with different file types.  Visit www.designevo.com/pricing.html to read more about the account types, options, and pricing.   

In conclusion, I would recommend Designevo to anyone who would like to design and customize their own brand and logo.  I didn't have any experience with this application, until I tried it out.  It was very easy to navigate and had many options and features to choose from.  I was able to create a logo, a website header banner, and a Facebook header banner in a matter of a few days.  All I did was create a new project,  change the size of the canvas, and added my information to the canvas.  However, I did find that I was not able to copy text objects from one project to another.  This would have been a helpful part of functionality to the application.   I did leave the team feedback on having the ability to do this in the future. 

If anyone uses Designevo to create a logo, please share it!  I would love to see what you created.  Have fun and enjoy!  


Tuesday, June 18, 2019

What's the buzz about Google Science Journal?


Lately, I have been hearing a lot about Google Science Journal, so I decided to experiment with it.  There are three things you need to know about it. 


1.  It is a FREE app that can be downloaded to any mobile device or tablet.  Visit the Google Play store or the Apple store to download it.  

To use it in education, the app must be downloaded through the Google admin console and pushed out to Android enabled devices.  This can be done through the device management, Chrome, and app management settings.  When you click the + sign to add approved apps to your domain, the Google Play store will open up.  At this time, you can search for the Google Science Journal app and install it to your domain.  Once  this is completed, you will have to configure the app.  I recommend you contact your Google administrator to perform this task.


2.  The Google Science Journal app creates a folder in Google Drive called 'Science Journal'.  This is where all of the journals will be saved.  Note, you cannot open any of the journals from Drive because they are not compatible with any Drive file type.  They must be opened with the app.  


3.  Journals can document notes, measure sensors, depending upon the device, record measurements, take snapshots, and upload images to your journal.  The journal is an ongoing notepad that keeps track of your experiment freely throughout the classroom, school, or other environment.  


I recently completed an episode about this on The Suite Talk.  Here is the link to the episode for more information. The video is about 22 minutes, and I go over the interface, and talk about the features and the purpose, especially for math and science classes.


You can listen to it on your favorite podcast too.   

The Wakelet Collection of resources from my show, The Suite Talk episode 79, is embedded.  In the collection, you can find the recorded episode, show notes, and links that were referenced during the show.


I hope you find the information helpful!  If you find this information helpful, please subscribe to The Suite Talk YouTube channel.


Listen and subscribe to it on your favorite podcast too. 


Wednesday, May 1, 2019

Three Technology Tools to Engage Students


I recently wrote an article for Learning.com, digital magazine, equip about creating meaningful and effective learning experiences using technology. 

Below is my entire article.  However, you can also click on this link to visit the published article on their website.  Thank you Learning.com for giving me the opportunity to write this article.


Children from a young age are exposed to technology, whether it is using a gaming console such as an Xbox or Playstation, interacting on the Internet, or using a mobile device or tablet. Today, it is expected we integrate technology into everything we do, especially education.

Teaching digital natives and engaging them can be challenging, but it is possible. As educators, we tend to be very creative in delivering a lesson but, at times, miss an 
opportunity to give the students an immersive activity to enhance the lesson. Supporting students in education with technology is just as important as the content being taught and, in my opinion, should go hand-in-hand.

With this in mind, we can reflect on our teaching and change the delivery of our lessons or activities to students.

Using the 5 Cs and SAMR for Effective Technology Integration

5 Cs of Education + Computing Skills: Using effective technology integration and aligning it with your curriculum will provide crucial life skills needed for their future by supporting the 5c’s of education, which are:
  • Communication to be able to convey ideas,
  • Critical thinking to find solutions to a problem,
  • Creativity to think outside of the box,
  • Collaboration to work with others,
  • And Curation to collect information about a topic.
Plus, it also supports computing skills, which include problem solving, problem probing, logical thinking, and computational thinking skills.

SAMR Model: It is also important to consider aligning your technology activities with the SAMR model. The SAMR model is a framework created by Dr. Ruben Puentedura that categorizes four different levels of classroom technology integration. The letters ‘SAMR’ stand for Substitution, Augmentation, Modification, and Redefinition.
  • The Substitution level is the lowest level and is defined as using technology as a direct substitute with no functional change, e.g. students typing a research paper into a Google document instead of writing it on paper. 
  • The next level is Augmentation and is defined as using technology as a direct substitute with functional improvement, e.g. students including videos and links to resources in their research paper.
  • The third level is Modification in which technology allows for significant task redesign, e.g. students sharing and collaborating in a Google document.
  • The highest level is Redefinition in which technology allows for new tasks that were never created before, e.g. students virtually connecting with other classrooms nationwide or worldwide to present their research.

Three Tools for Engaging Technology Experiences

As an educator, I feel technology can be used to inspire students to think big, to have a positive impact on the world, to become inventors, and to be innovators. There are many excellent technology tools that can align with your curriculum and satisfy these skills. However, I will focus on the Google for Education and G Suite ecosystem tools, as well as third-party applications.

Google Classroom

Google Classroom is an application available in Google for Education that allows students to access your classroom materials, lessons, assignments, and resources anytime, anywhere, and on any device. It gives teachers a platform to digitize their classroom routines by creating conversations, assignments, and quizzes, and providing guidance, support, feedback, and grading on assignments. It gives a voice to all students in the classroom and a platform to communicate with their teachers and their peers and model good digital citizenship.

For example, a group of students can share and collaborate on a project and use Google Slides to present it. To further enhance the activity, they can use the Screencastify Chrome extension to narrate or explain their work and then insert the video directly into the slide using the Screencastify add-on for Google Slides. This example can be used in any class and allows students to be exposed to the Modification and Redefinition levels on the SAMR model and supports the 5 Cs of education as stated above.

Bonus: Using computer applications, like those in the G Suite, helps students grow their digital literacy skills with hands-on practice.

Google Jamboard

Another tool I would recommend is Google Jamboard. Jamboard can be accessed via the web at jamboard.google.com or using the free app that can be downloaded from the Google Play Store or Apple Store to your mobile device. I consider Jamboard a think space because it is dynamic and collaborative and is a blank canvas that can be used for anything. Giving students a blank canvas supports the 5 Cs, organizational skills, and visual learners too. The best part is that it integrates with G Suite, so you can use it with Google Classroom! To access Jamboard, simply go to jamboard.google.com, or go to Google Drive and select ‘New’, ‘More’, then ‘Google Jamboard’ from the drop-down menu. 


A few examples are to have students respond to an essential question, label diagrams to support concepts, illustrate the cover of the story, allow students to brainstorm and document information, or organize information into a flow chart or concept map. Students can reply to all these tasks by using the side menu on the screen. In addition, students can share their Jams with a peer by clicking on the ‘Share’ button or with their teacher by linking it into an assignment in Google Classroom.

Another example of using Jamboard is to allow students to research or document a sequence of events to create a storyboard. Create a new Jam and insert as many frames (pages) as needed. Each frame can refer to different expectations or questions.


You can also use Jamboard in math class, which will allow students to show what they know using a digital format. Create a new Jam template with multiple frames so that the first frame has a quick reference or formula sheet to support your concept. Then, on the additional frames, use the post-it note feature to type the question you want them to solve. Use one question per frame, and if students need more space, they have the ability to add frames. If necessary, afterwards, you can change the background of the Jam to graph paper or notebook paper.
Finally, you can create this assignment in Google Classroom and link the template to it as ‘make a copy for each student;’ and when the students open the assignment, they will automatically receive your template. You are done!! You just provided your students with a digital copy of your assignment, while supporting collaboration, communication, critical thinking, and creativity as well as the Modification level on the SAMR model.
Bonus: Further enhance technology integration by using the Science of Learning to optimize instruction.

Google Expeditions

Another example of using immersive technology is Google Expeditions. This free app can be downloaded from the Google Play store or Apple store onto any mobile device or tablet. I always recommend searching for expeditions using the spreadsheet that is available. Since there are many expeditions available, the easiest way to search is to click inside the spreadsheet and press ‘CTRL’ + ‘F’ on the keyboard. It will open a search box at the top of the sheet, then you can type a keyword to filter out the results.
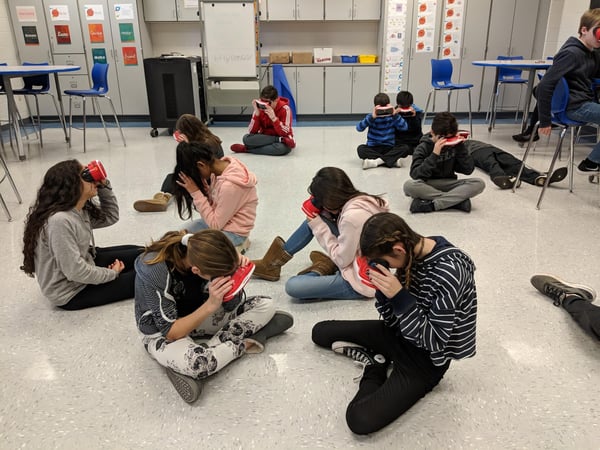
Using Google Expeditions will bring your lessons to life! It gives you the opportunity to be a tour guide, to take your students on virtual field trips using virtual reality, and to explore different objects, all within your classroom.

Virtual Reality: Google Expeditions allows your students to go on virtual field trips and visit places like the Great Barrier Reef, or the Pyramids of Egypt, or, even, the Grand Canyon within your classroom. Teachers control the pace of the tour, point out specific items in the scenes, and read the information provided to the class. Students can experience a landmark or location using 360-degree technology.
google-expeditions-virtual-reality
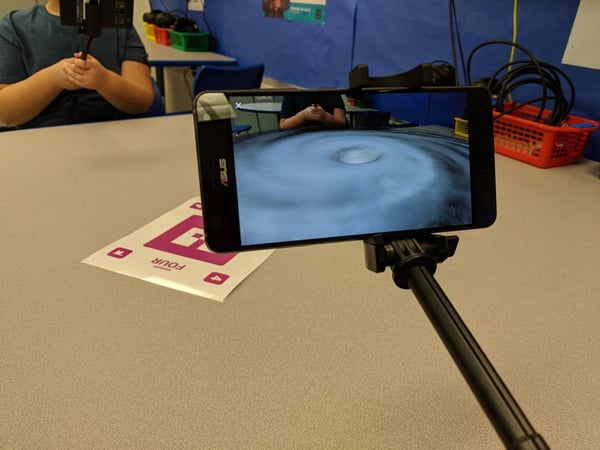
Augmented Reality: Additionally, students can explore 3D objects using augmented reality. You can have your students dive into a weather system such as a hurricane; explore parts of the human body like the respiratory system; and study earth and life science such as volcanoes, insects, cells, and dinosaurs.
google-expeditions-augmented-reality
The students’ reactions to these experiences are truly priceless! Using Google Expeditions gives your students an immersive learning experience, allows them to dive deep into their learning, and supports the Redefinition level on the SAMR model and the 5 Cs.

Bonus: Build on this immersive experience with technology by cultivating students' digital citizenship skills through teaching digital literacy.

In conclusion, there are tons of technology tools that you can use with your students and align with your curriculum. However, keep in mind that the educator drives the lesson and plants the seeds to make the content meaningful, engaging, and immersive for the students. At some point during the activity, student leaders will emerge, and the educator becomes a facilitator who will guide them through the technology components for the remainder of the lesson. This type of classroom environment supports the SAMR model and the 5Cs – communication, critical thinking, creativity, collaboration, curation – plus computing skills that are all much needed life skills for students be successful in their future.

Saturday, April 6, 2019

IdeaBoard for Jamboard


If you know me, you know that I LOVE Jamboard.  I am so thankful that my district purchased one for me this year. Although there are a few features I still need to explore, I learn something new every time I use it, and I fall in love with it even more.  

I have covered Jamboard several times on my show, The Suite Talk, with guests like Tom Mullaney, Steven Hope, Kassie Drey, Philip GoodrichAshley Stout, and Emily Bruns.  Its no surprise that my PLN has embraced this new cutting edge app/tool and use it in their schools and classrooms too.  I learn a new tip or trick from these experts by following them on Twitter.    

I wanted to share the love of Jamboard with a broader audience, so I created the Ideaboard for Jamboard resource.  The purpose of my ideaboard is to promote Jamboard, support others who are using, inspire others who are unfamiliar with it, and to learn and share ideas with my audience.

It offers an introduction to Jamboard, ideas on using it in the classroom, and allows you to share your idea too.  Each idea is hyperlinked to a Google Slideshow that includes a learning goal, how it is aligned, examples and templates.

Some of templates were created by Philip Goodrich from BenQ.  If you like any of those templates, you can download them as an image by clicking on  the link in the slide, then inserting it as a background image in your Jam.  The examples posted are taken from my some of experiences in the classroom and during training sessions.


Bitmoji Image


Please feel free to look at the IdeaBoard for Jamboard.  If you are using Jamboard in the classroom, please share your idea with me and help me #PayitForward and help other educators integrate technology into the classroom.  This information can be found on my website, The Suite Talk, www.thesuitetalk.com 


You can also visit The Suite Talk, and watch past episodes about Jamboard.  My show is available as a podcast too.  Visit my website and click on the 'Subscribe' page to stay up to date on the latest episodes.


Listen to The Suite Talk podcast on Podbean, Spotify, Apple Podcast, and on Google Play Music.


Monday, March 18, 2019

The Chemistry Merge Cube Project


Recently I was featured on a YouTube Live event for CoSpaces EDU with Michael Fricano to demo my Chemistry Merge Cube project that I created for middle school science.

Although, I used CoSpaces in the past, this was my first time using the Merge Cube add-on for it.  I just dove in and started to create my scenes and content for the project. 

I added three scenes which displayed a label to the chemistry topic, plus each scene had four questions.  Because I am a Google girl, I had to align it with a quiz that I created using Google Forms.  The Forms quiz had the same questions, plus I added a few more, and I set it up to release the grade to the students immediately. 

Additionally, I needed labels which were created using Google Drawings.  I was able to customize the formatting of the labels easily in Drawings.  When the labels were completed, I downloaded each one as a png file, then uploaded into the CoSpaces library.  This allowed me to reuse the labels in the project.   

Finally, I coded the space to allow the students to navigate through the scenes.  The students were able to go to the next scene or back to the previous screen.  As always, I love to code and I learned a lot using this platform. 

If you are interested in viewing the show, you can visit the YouTube link to watch the show.  Here is the link to my Chemistry project in CoSpaces.

If you really want to engage your students and immersive them with ARVRinEDU, 3D and 360 degree technology, I would highly recommend creating an account for CoSpacesEDU.  I am fortunate enough to have a school subscription for this tool that includes the Merge Cube add-on, but if you want to try it for free, use the promo code of  COSMICHAELFR.  You will get a 30 day free trial.


Wednesday, February 20, 2019

Did you know about this Google Classroom update?


The Google for Education team has listened to all of the feedback from their users and has provided a few more new features in the latest Google Classroom update.


First, you are now able to move posts to the top on the Stream page, (not on the Classwork page).  Simply click on the 3 dot menu of the post and select 'Move to the Top'.  Now, the Stream page can be organized by putting the most recent assignment or announcement to the top.  


Additionally, you can now control how to setup classroom notifications simply by going into the setting menu, select 'Classroom on the Stream' in the General section, and choosing one of three options.  

  • Hide notifications (no classwork notifications will appear on the Stream page).
  • Show condensed notifications (show collapsed view).
  • Show attached and details (show expanded view).
You can read more about this update in the Google Classroom help forum community. 

Keep sending the team feedback by clicking on the ? at the bottom of the screen in Google Classroom.  They are always listening and prioritizing the feedback to improve Google Classroom.